
Appointment Scheduler
Allowing users to schedule service appointments for their vehicles on toyota.com.
Lead UX/UI Designer
Feb. 2023
June 2023
Background
As Toyota strives to enhance their online customer experience, it’s imperative we provide users an appointment scheduling experience without having to leave the site.
Challenge
Shoppers and owners are searching for sales and service appointment scheduling tools on the Toyota website, but have to exit and visit a dealer website in order to do so, either giving up altogether or slowing the leads process.
Opportunity
Design an integrated appointment scheduler on the highest business tier, so users can take valuable actions and connect with the dealer right then and there, creating long-term brand loyalty and cultivating hard leads.
Outcome
After implementing our new tool, a 90-Day Report showed the following:
11%
of account logins came from the appointment scheduler.
9.5%
of account creations came from the appointment scheduler.
50k+
customers signed in to schedule service appointments.
Approach Overview
We know there is high demand for an appointment tool, with the “Service Centers” page having the highest traffic of all owner’s-related pages (112k+ average monthly visits). The scheduling process is generally a dealer’s first impression and critical touchpoint, so we used the double diamond framework to deliver an exceptional experience.

Approach Overview

We know there is high demand for an appointment tool, with the “Service Centers” page on toyota.com having the highest traffic of all owner’s-related pages, pulling in 112k+ average monthly visits. The scheduling process is generally a sales or servicing dealer’s first impression, so we needed to deliver an exceptional experience for these touch-points.
Discovery
To understand user needs and uncover key insights, we began with a competitive audit of other tools and then conducted user testing on the Toyota App's existing appointment scheduling tool.

Landscape Anaylsis
We found that almost all competitive brands give users the option to schedule service or a test drive on their main platform. Within respective placements and tools, a CTA for “Test Drive” was usually given more prominence than a CTA for “Request a Quote” or "Contact a Dealer".
We then investigated the flow for each competitor’s actual scheduling tool, with most leveraging external platforms for UI, leading to some inconsistencies and usability issues. To better support our budget, branding, customization, and overall user experience goals, we chose to build a custom scheduler tool. Key takeaways from our tool audits include:
Account creation should be optional
Users can typically make appointments without having to create an account.
Aim for a low-friction start
Barrier to entry is eased by collecting personal/account info after gathering basic appointment details.
The tool should be flexible & adaptive
There were no universal scheduler tools - sales & service appointments are usually kept separate.
Shopper & owners kept separate
There were no universal scheduler tools - sales & service appointments are usually kept separate.
Service First
Given resourcing constraints and the client's emphasis on strengthening the current ownership experience, we prioritized service scheduling first, with test drives planned as a fast follow. Adding service scheduling at the highest business tier represents a major value-add, and given that the Toyota App's version already exists, we had a quicker path to implementation.
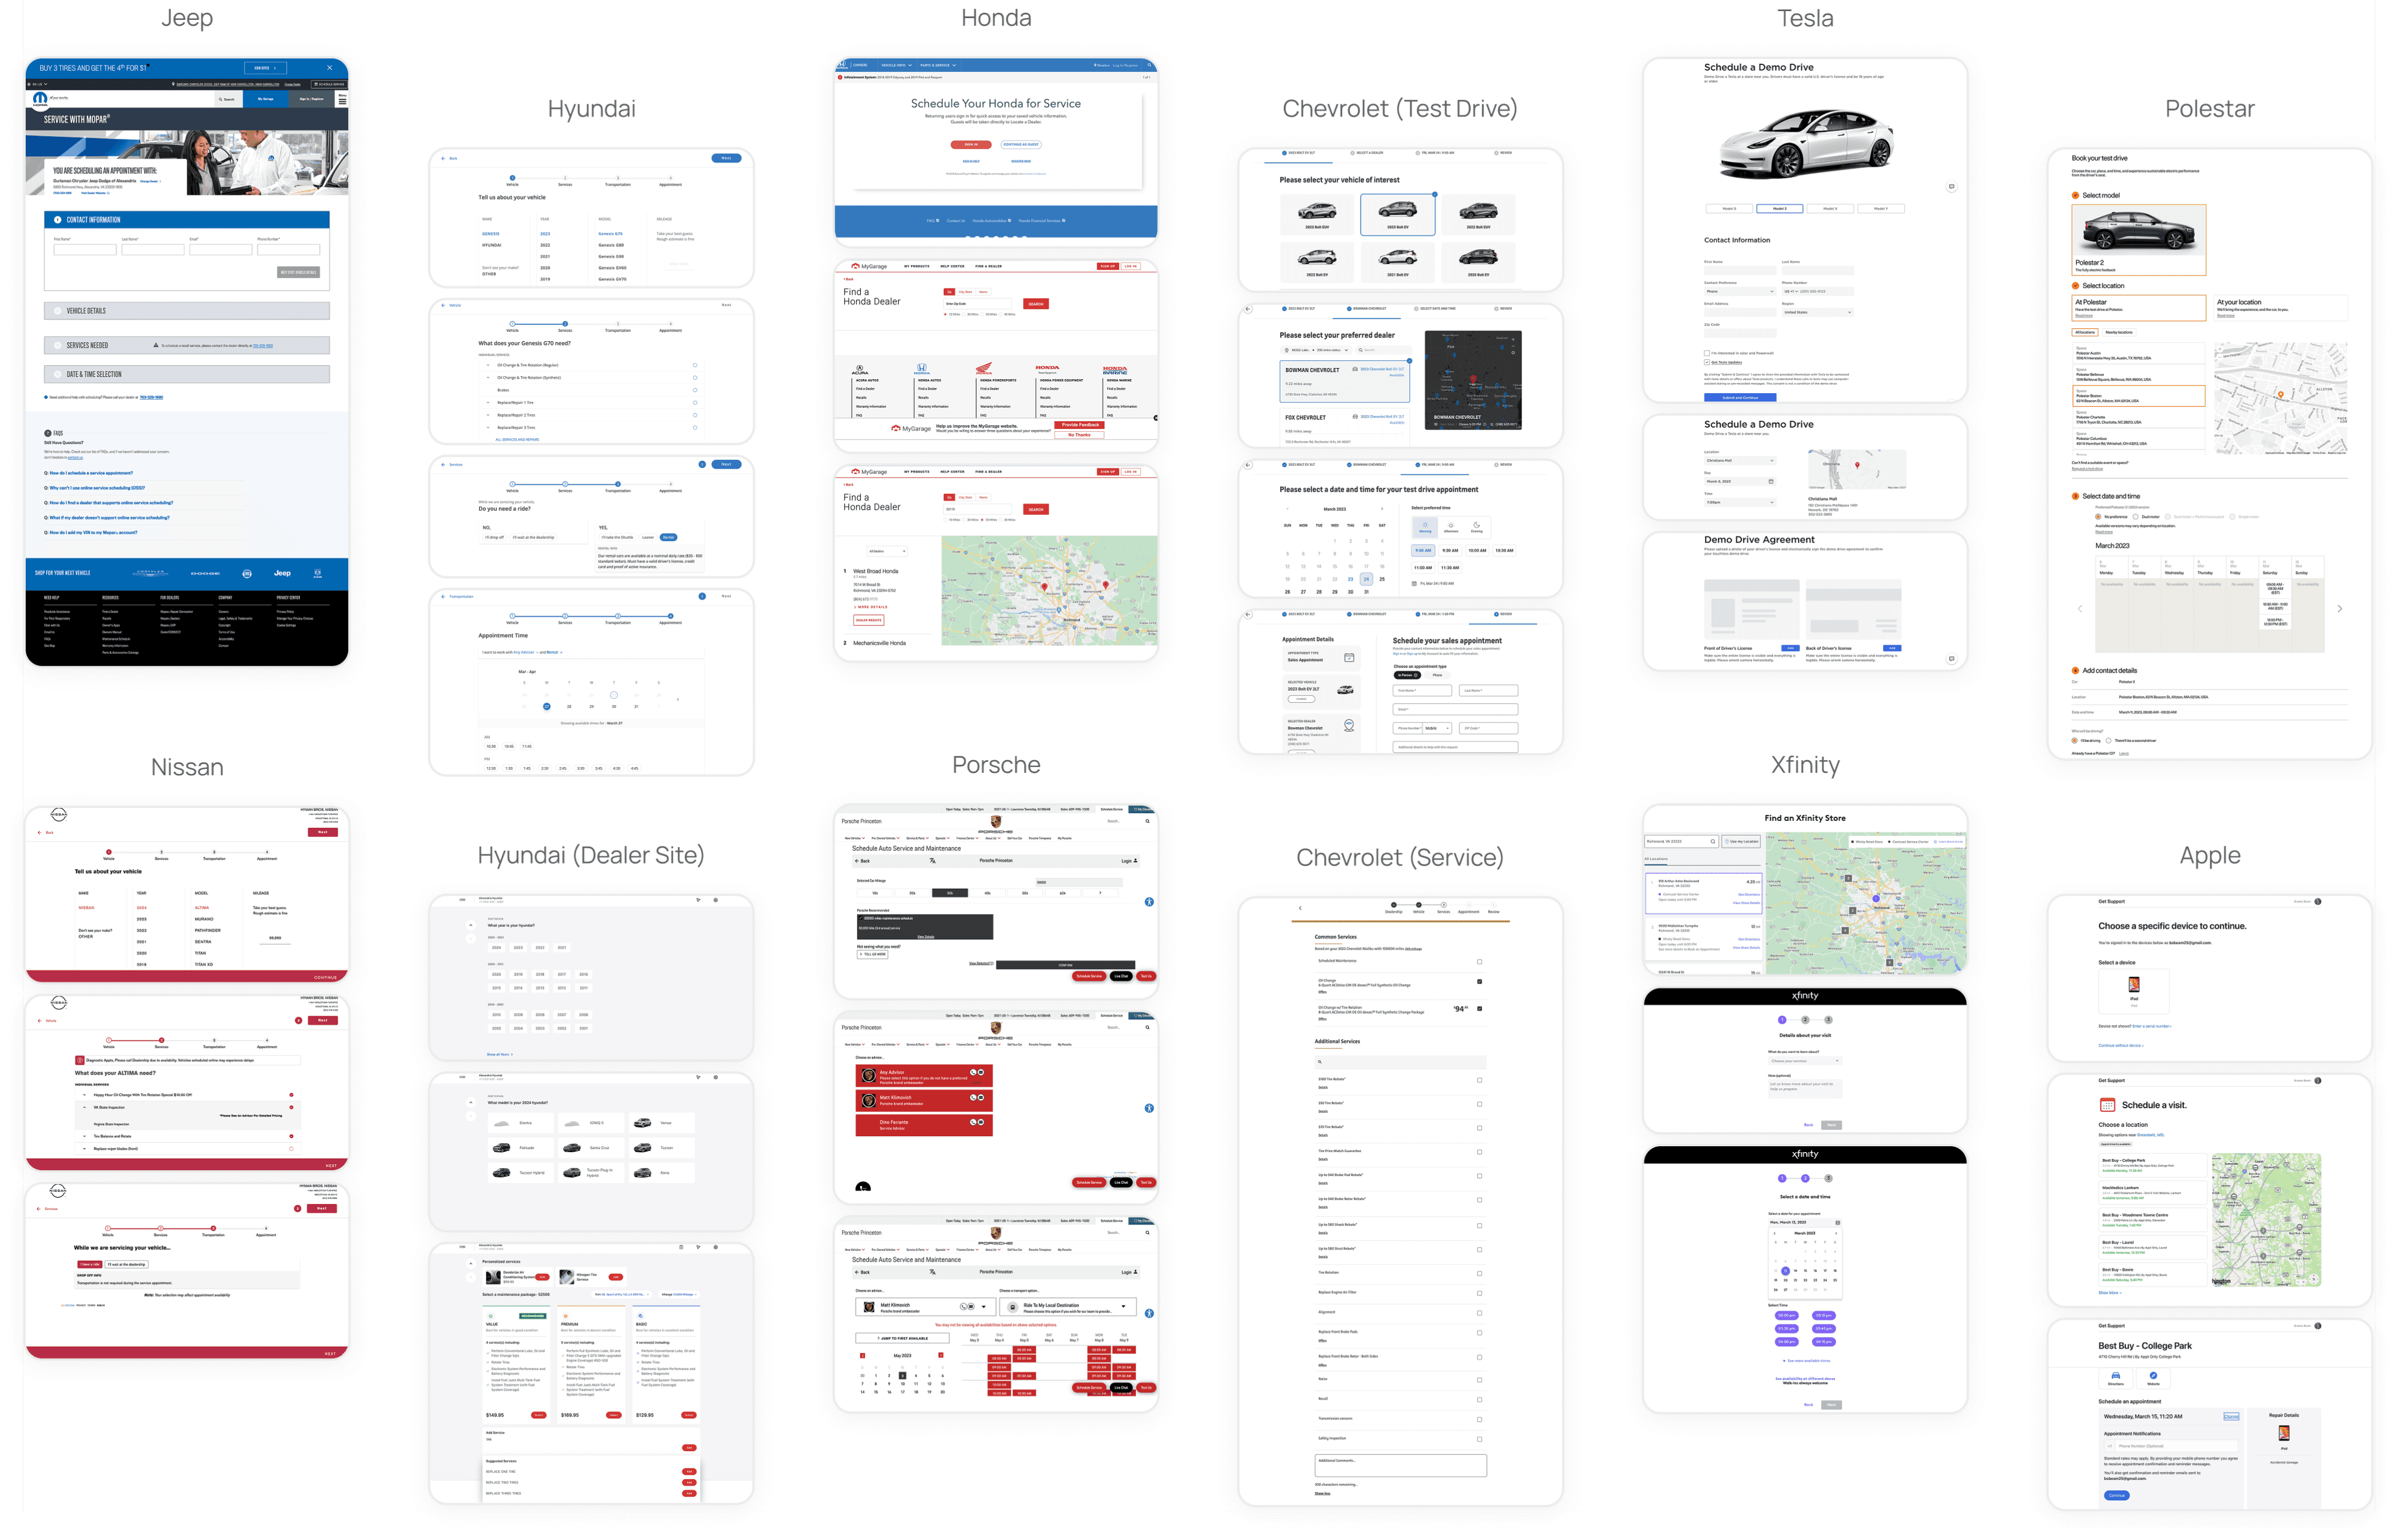
Service First
Given resourcing constraints and the client's emphasis on strengthening the current ownership experience, we prioritized service scheduling first, with test drives planned as a fast follow. Adding service scheduling at the highest business tier represents a major value-add, and given that the Toyota App's version already exists, we had a quicker path to implementation.
Current App Experience
We aimed to maintain general parity with the existing app scheduler's flow and functionality for our web implementation. Toyota manages their app internally, so we kept in mind a key pain point for our users is the lack of information transfer between web and app accounts. To ease the burden of scheduling, we made sure users would not be asked to re-provide information that's already been captured elsewhere.
Toyota App Schedule Service Flow


Enter Mileage

Select Services

Select Advisor

Select Transportation

Select Date & Time

Confirmation
Phase 01
Pre-Scheduling Stage Findings


Personal info is gathered at the beginning of the process, and not all previously captured info is pre-populated.
“I would have liked to see my last visit and personal information stored to make the process go more quickly.”
Male, Gen Y
Participants are shown all services upfront, which can be overwhelming.
"With other scheduling platforms, like Equinox, if I want more info I can opt to see it instead of being overwhelmed with a busy screen. This was a huge pain point."
Male, Gen Z
Usability Observations
To inform the best possible MVP for our web implementation of Toyota's app-based service scheduler, we conducted a two-phase study: a 3-day online research community for broad comparative feedback, followed by 15 in-depth interviews to dive deeper into scheduling behaviors and pain points. In total, 44 Toyota owners participated (26 men 25–45 years old, 18 women 46–65 years old, spanning all four U.S. regions). All participants had booked a service appointment within the past six months.
Design Implications
Simplicity and clear navigation are our quick wins — fewer steps, less complexity. Using progressive reveal and limiting options shown upfront will ease the mental burden for the user. We should stick to familiar scheduling patterns while building education and transparency around service offerings. Rather than directing users to contact the dealer and presenting them with dead ends, the tool should be able to handle all information gathering and provide answers.
Phase 02
Scheduling & Post-Scheduling Stage Findings


Participants want transparent service pricing and timing, and disliked having to call the dealer during any point of the process.
“They don't tell you how long the service will be, so I would plan for longer than you think."
Female, Gen Y
Participants appreciated the thorough dealer communications.
“I do like that I get both email and text, because sometimes I miss one or the other. I like the confirmation email, and the text-reminders."
Female, Gen Z
Design Implications
Simplicity and clear navigation are our quick wins — fewer steps, less complexity. Using progressive reveal and limiting options shown upfront will ease the mental burden for the user. We should stick to familiar scheduling patterns while building education and transparency around service offerings. Rather than directing users to contact the dealer and presenting them with dead ends, the tool should be able to handle all information gathering and provide answers.
Business Requirements
For the purpose of confirming legitimate appointments and the overarching business goal of getting users to create accounts and add their VINS, the business outlined a critical constraint for our MVP launch.

Adding a 17-Digit VIN
Users would have to add their Vehicle Identification Number before scheduling service, which is only possible in a logged in state. We recognize that only a small percentage of users (~2%) add their VIN during account creation, which would impact the scheduler's completion rate. However, this requirement provides a default dealer, confirms the legitimacy of the appointment, and gives the dealer critical vehicle information to provide helpful service recommendations and a higher quality service experience. We may revisit this requirement post-launch based on performance data and user feedback.
Stacked Scheduler

Step 1: Vehicle Details
Once signed in, users will select a vehicle from their account, or add a new one. Once selected, they'll add the VIN (if not already added) and mileage.

Step 2: Dealer
A preferred dealer will be shown on default based on the added VIN. To choose a different dealer, the "Change Dealer" CTA will open the find a dealer modal.

Step 3: Services
Users can view services recommended to them based on their selected dealer and location, as well as the total estimated cost of their added services.

Step 4: Advisor
By default, any advisor will be selected. If they choose a preferred service provider, this selection will be carried over for any future appointments.
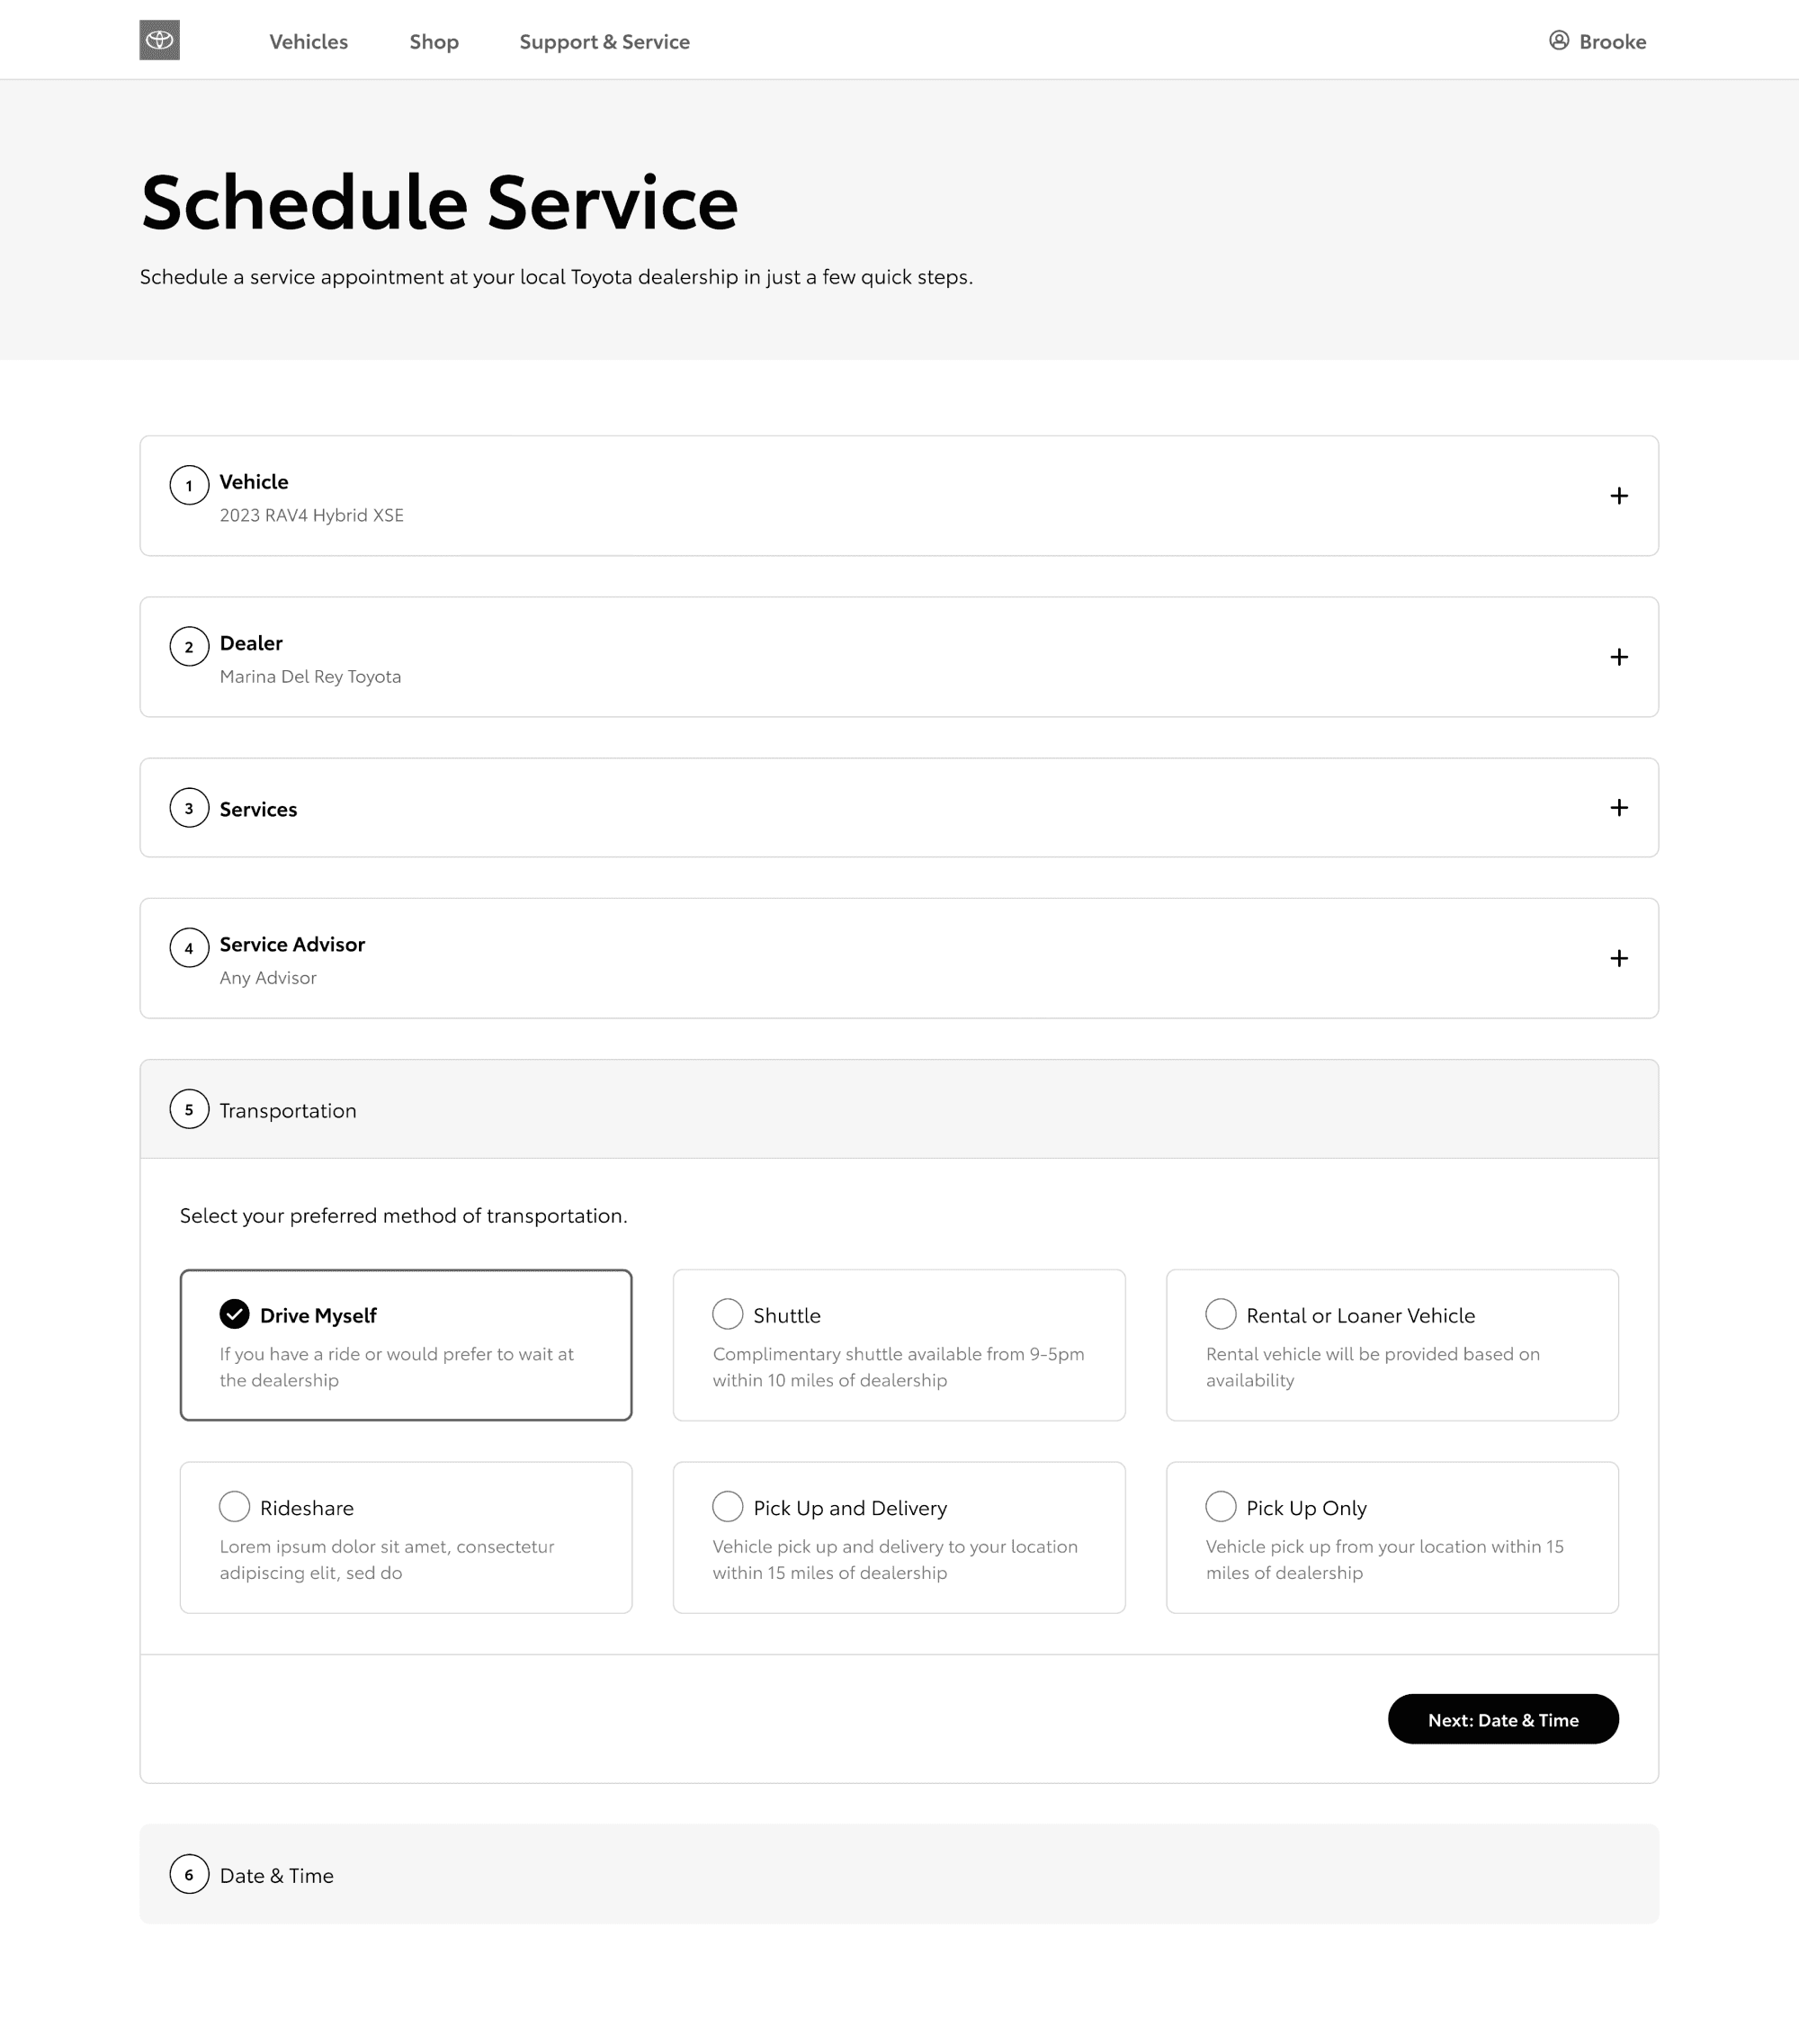
Step 5: Transportation
On this step, users choose transportation - if they select pick up/delivery or both, they need to add or confirm their address for these locations. If they have already provided their address during account creation, we will pre-populate it.

Step 6: Date & Time
Users will use a calendar component for date and time selection - only available appointment times will appear.

Step 7: Review
Users will confirm their appointment and book on this step, or can go back and edit.

Booking Confirmation
Once booked, appointment details will be visible on the account dashboard within the "My Appointments" section. From here, users can view and manage upcoming and past appointments.
Wireframe Directions
Knowing this experience would be VIN-gated, which is a large barrier to entry, we ensured designs were seamless, simple and as user-friendly as possible. We presented two high-fidelity wireframe directions to client.
Linear Scheduler
Recommendation

Step 1: Vehicle Details
Once signed in, users will select a vehicle from their account, or add a new one. Once selected, they'll add the VIN (if not already added) and mileage.

Step 2: Dealer
A preferred dealer will be shown on default based on the added VIN. To choose a different dealer, the "Change Dealer" CTA will open the find a dealer modal.

Step 3: Services
Users can view services recommended to them based on their selected dealer and location, as well as the total estimated cost of their added services.
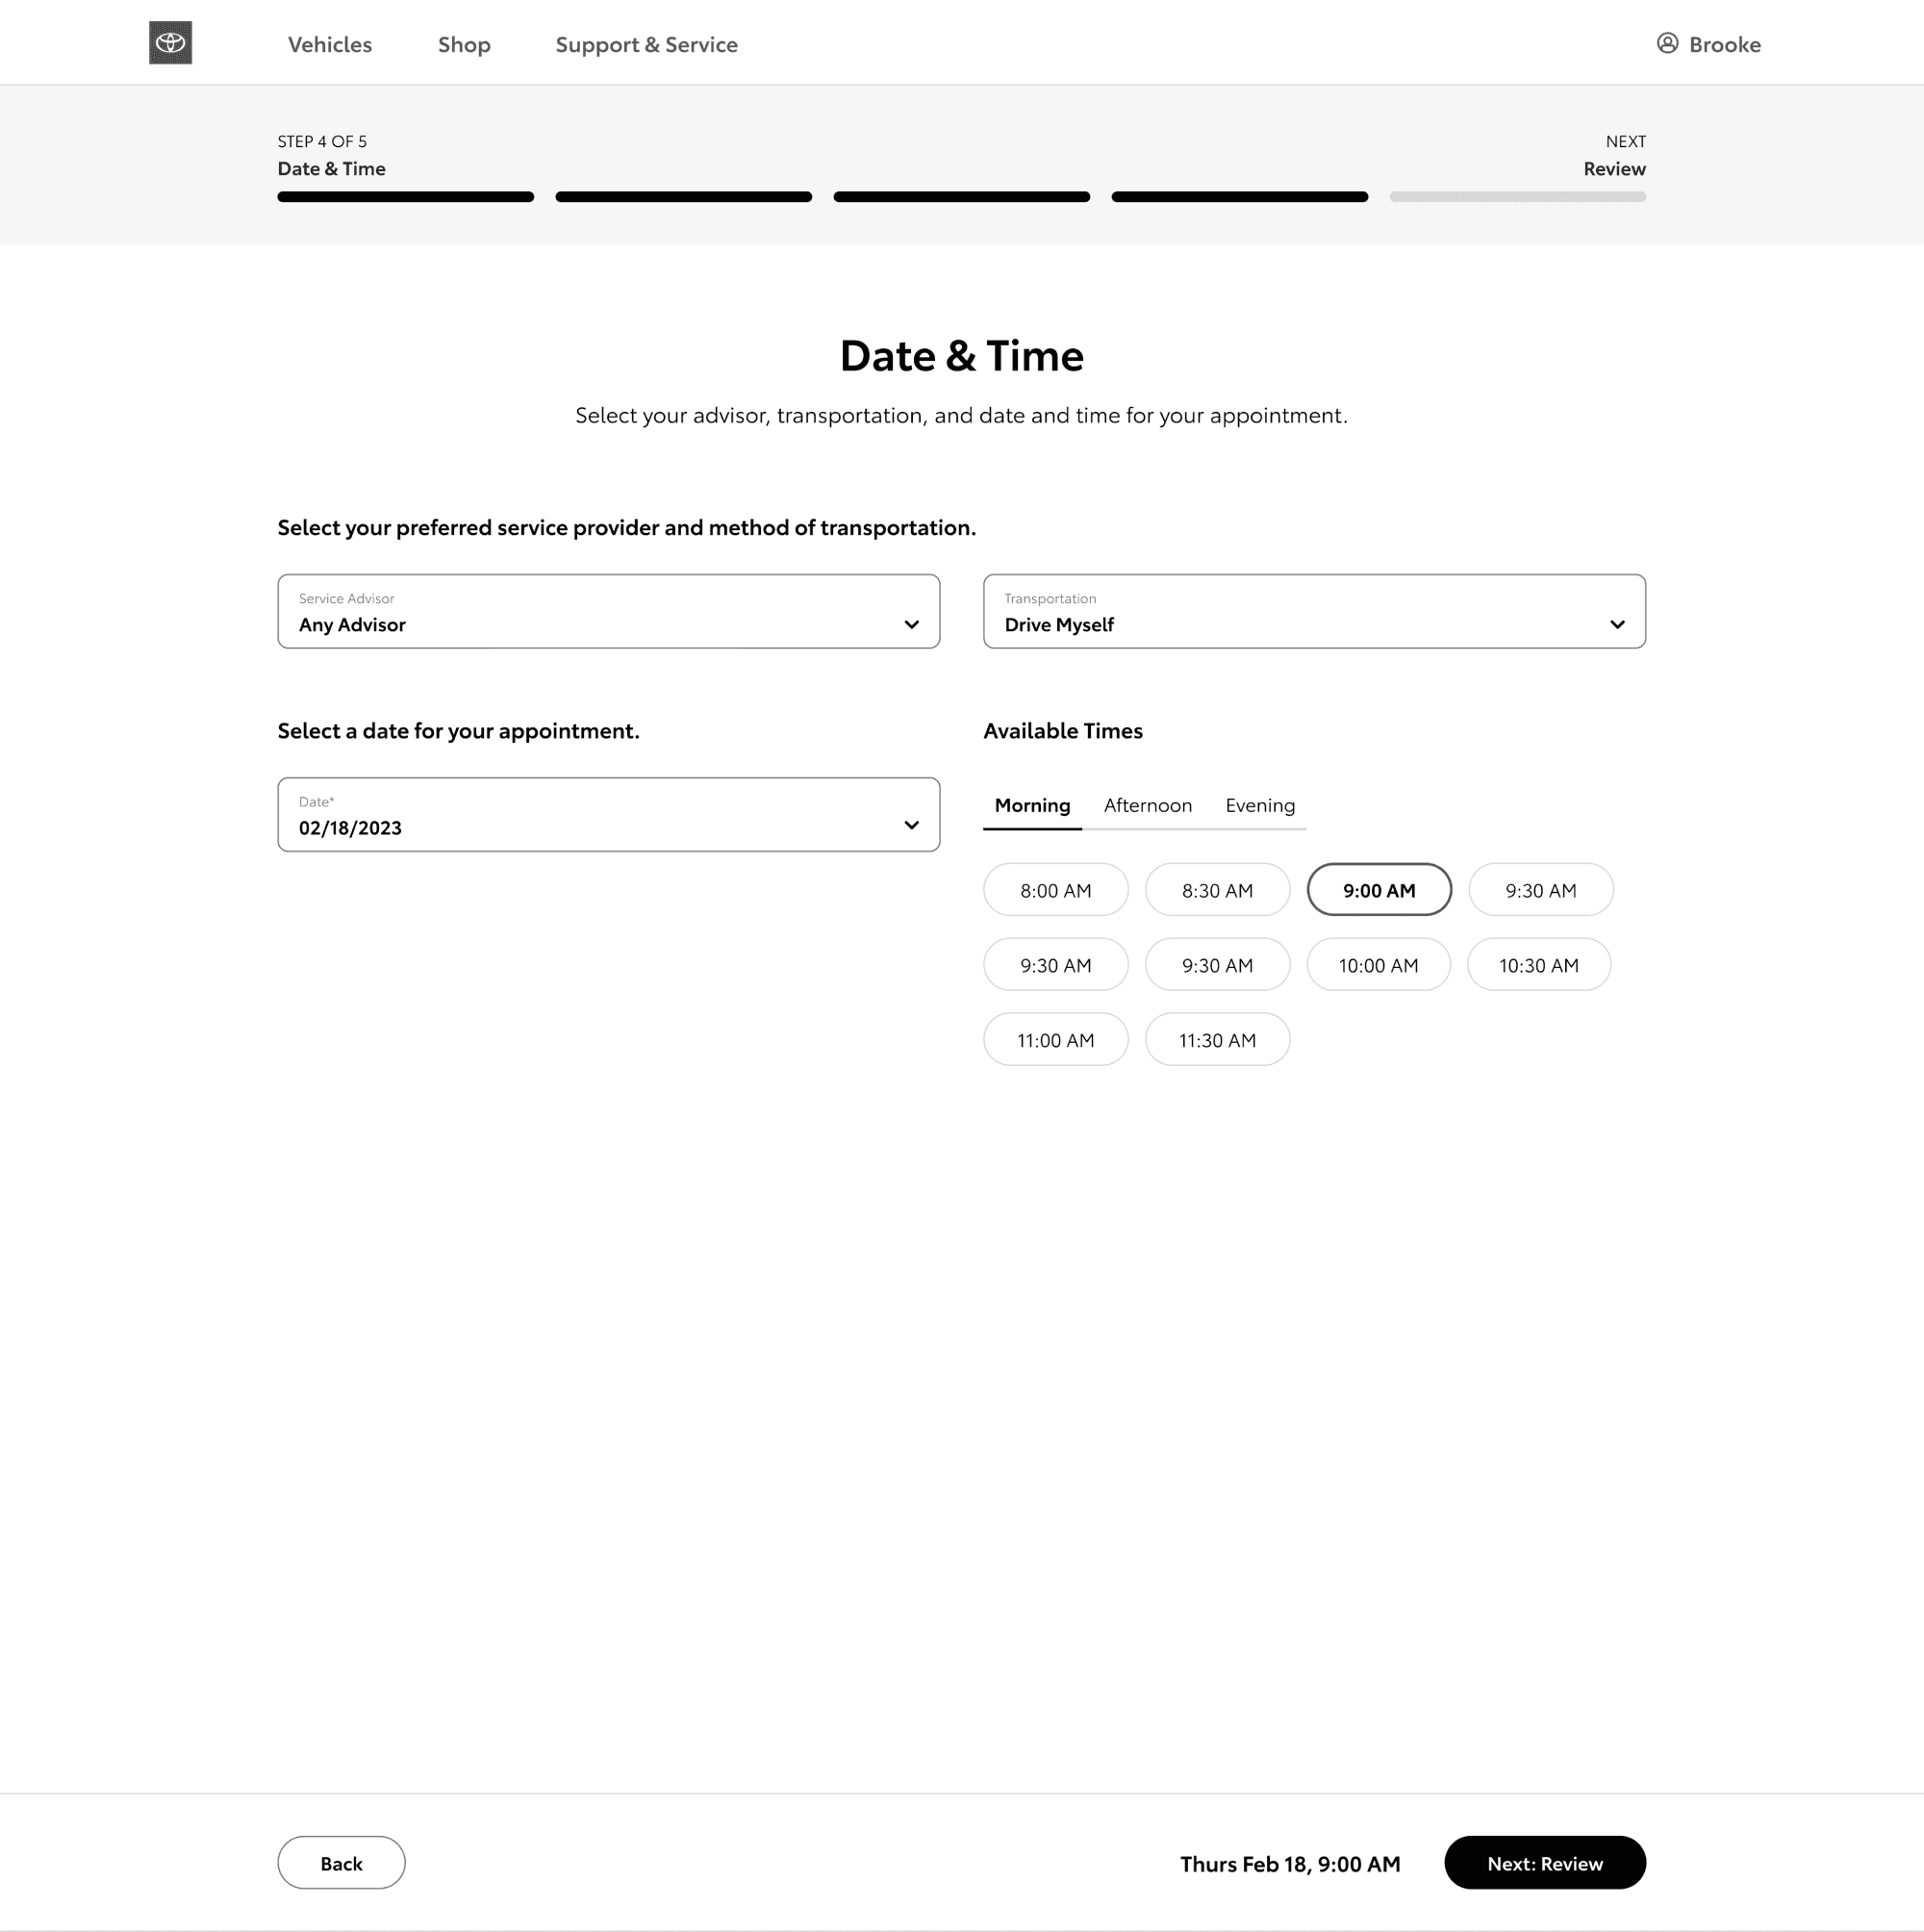
Step 4: Final Details
This step consolidates advisor and transportation selection (pre-selected by default) and date and time selection.

Step 5: Review
Users will confirm their appointment and book on this step, or can go back and edit.
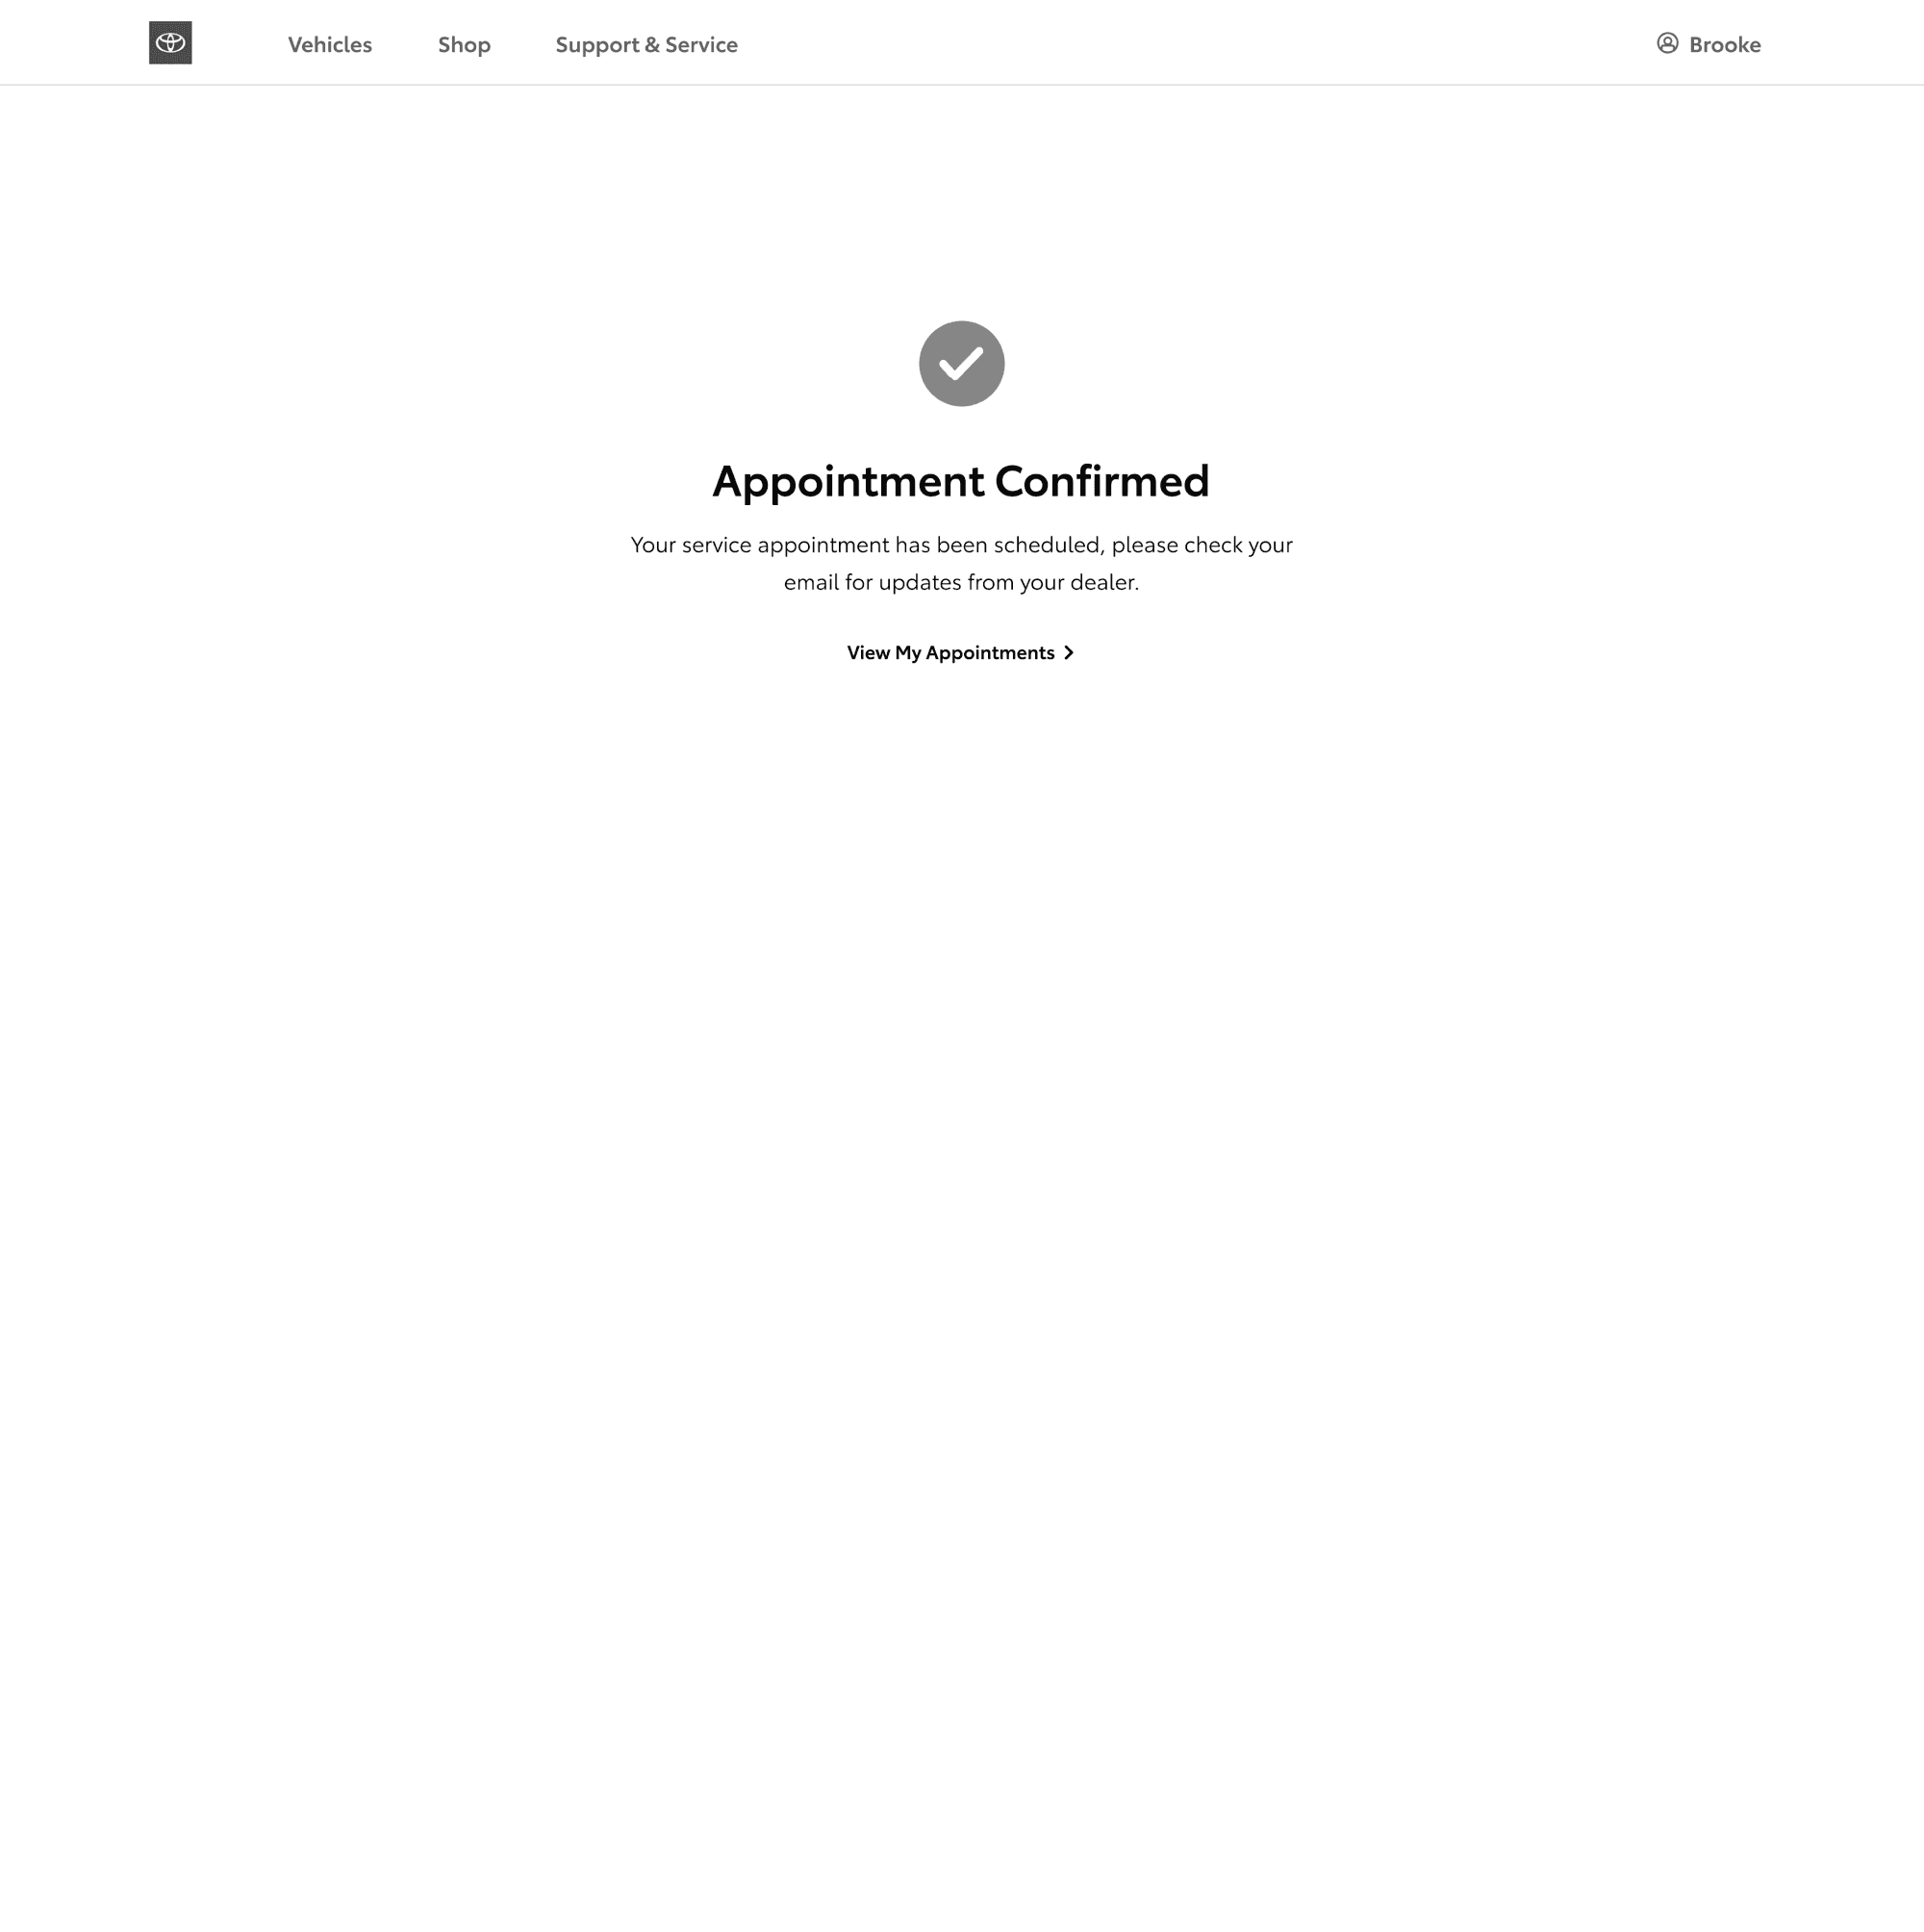
Booking Confirmation
Once booked, appointment details will be visible on the account dashboard within the "My Appointments" section. From here, users can view and manage upcoming and past appointments.
Stacked Scheduler
Step 1: Vehicle Details
Once signed in, users will select a vehicle from their account, or add a new one. Once selected, they'll add the VIN (if not already added) and mileage.
Step 2: Dealer
A preferred dealer will be shown on default based on the added VIN. To choose a different dealer, the "Change Dealer" CTA will open the find a dealer modal.
Step 3: Services
Users can view services recommended to them based on their selected dealer and location, as well as the total estimated cost of their added services.
Step 4: Advisor
By default, any advisor will be selected. If they choose a preferred service provider, this selection will be carried over for any future appointments.
Step 5: Transportation
On this step, users choose transportation - if they select pick up/delivery or both, they need to add or confirm their address for these locations. If they have already provided their address during account creation, we will pre-populate it.
Step 6: Date & Time
Users will use a calendar component for date and time selection - only available appointment times will appear.
Step 7: Review
Users will confirm their appointment and book on this step, or can go back and edit.
Booking Confirmation
Once booked, appointment details will be visible on the account dashboard within the "My Appointments" section. From here, users can view and manage upcoming and past appointments.
Linear Scheduler
Recommendation
Step 1: Vehicle Details
Once signed in, users will select a vehicle from their account, or add a new one. Once selected, they'll add the VIN (if not already added) and mileage.
Step 2: Dealer
A preferred dealer will be shown on default based on the added VIN. To choose a different dealer, the "Change Dealer" CTA will open the find a dealer modal.
Step 3: Services
Users can view services recommended to them based on their selected dealer and location, as well as the total estimated cost of their added services.
Step 4: Final Details
This step consolidates advisor and transportation selection (pre-selected by default) and date and time selection.
Step 5: Review
Users will confirm their appointment and book on this step, or can go back and edit.
Booking Confirmation
Once booked, appointment details will be visible on the account dashboard within the "My Appointments" section. From here, users can view and manage upcoming and past appointments.
Feedback
We received feedback on wireframe directions from the internal team, clients and stakeholders.
Ensure navigation stays visible at all times (mobile-first), and keep steps simplified without burying key information, especially on the service selection step.
Use direct, clear, and conversational language throughout the flow. Users should be able to educate themselves about unfamiliar services, especially first time schedulers.
For dealer selection, include map imagery for quicker recognition. For date selection, allow users to type in their preferred date in addition to selecting from the calendar dropdown.
Feedback
We received feedback on wireframe directions from the internal team, clients and stakeholders.
Ensure navigation stays visible at all times (mobile-first), and keep steps simplified without burying key information, especially on the service selection step.
Use direct, clear, and conversational language throughout the flow. Users should be able to educate themselves about unfamiliar services, especially first time schedulers.
For dealer selection, include map imagery for quicker recognition. For date selection, allow users to type in their preferred date in addition to selecting from the calendar dropdown.
Final Interface
Our recommended direction, the Linear Scheduler, was the preferred option. It offered more familiar interaction patterns that resonated with the team and aligned with typical scheduling tools across the competitive landscape. This direction included a progress tracker, consolidated smaller steps, and made it easier for users to complete sub-tasks within the flow than the accordion version. Overall, it was more digestible, usable, and simple.
MVP Features List
01
Create and manage service appointments
02
Ability to view appointment history
03
Ability to add a vehicle or edit a Preferred Dealer
04
Pre-populate any relevant previously captured data
05
Confirmations and reminders from dealer
01
Create and manage service appointments
02
Ability to view appointment history
03
Ability to add a vehicle or edit a Preferred Dealer
04
Pre-populate any relevant previously captured data
05
Confirmations and reminders from dealer
Recommended Entry Points
Homepage
Vehicle Dashboard
Owner’s Resource Pages
Find a Dealer Map
Service Offers
Scheduler Tool


Step 1: Vehicle Details
Before accessing the tool, users must sign in or create an account. During account creation, they can add one or more vehicles via VIN or model/year. Users who skip this will be prompted to add a vehicle/VIN and estimated mileage on this step. For users with telematics, mileage auto-populates.

Step 2: Dealer Details
The user's VIN identifies their Preferred dealer, so we'll surface this automatically. If they'd rather use a different dealer or are in another location, the "Change Dealer" CTA opens a modal where they can input their location to find alternatives.

Step 3: Services
On this step, users see recommended services, based on manufacturer and dealer. They can add service bundles or individual services, and can tab over to "All Services" to browse all offerings. Users can add notes about specific needs, with pricing available in an expandable drawer.

Step 4: Final Details
This step includes adding date & time, and advisor & transportation (optional fields). Choosing "Pick Up", "Delivery", or both reveals an address input field below. If an address was already captured during account creation (optional entry), it should auto-populate.
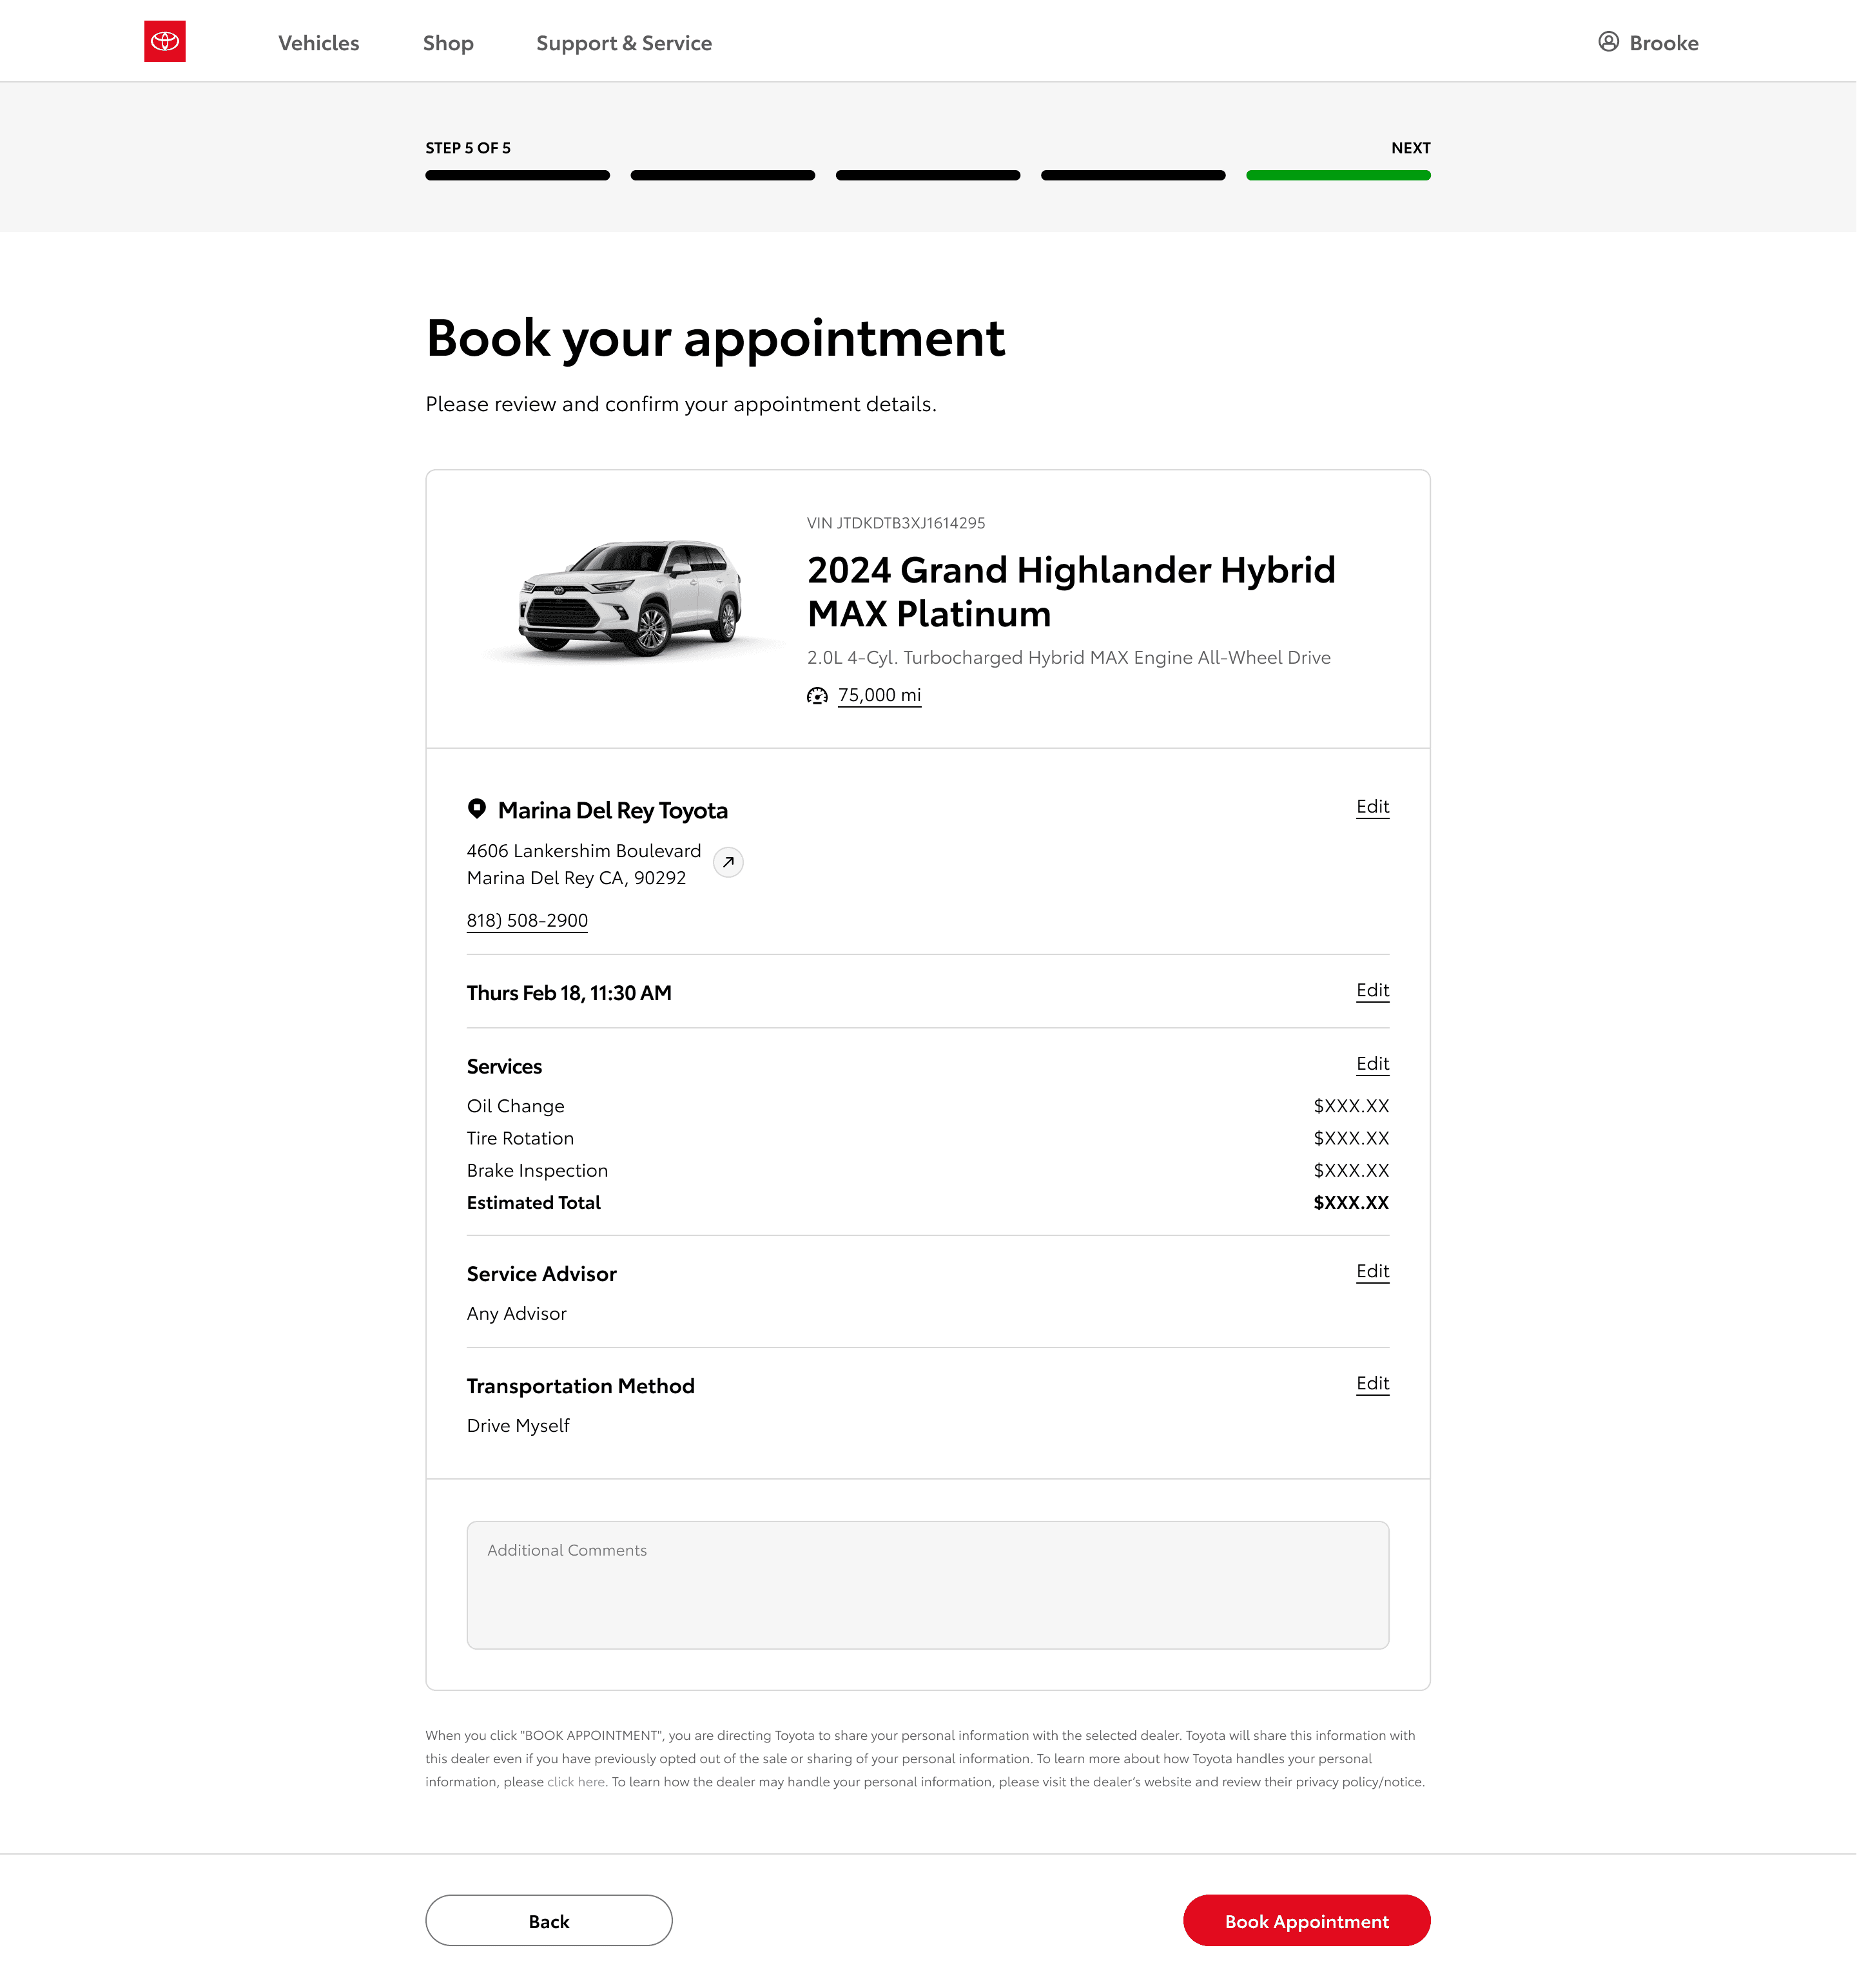
Step 5: Review
On the final step, users review their details and confirm before completing the booking. They can click "Edit" to jump back to that point in the stepper. Editing vehicle or dealer details will require redoing all subsequent steps, since those choices affect everything downstream.

Booking Confirmation
Once booked, appointment details appear on the user's account dashboard under "My Appointments," and are also accessible from the vehicle dashboard. From here, users can view upcoming and past appointments, see pricing, add to calendar, or cancel.
MVP Features
Combined map and list view for mobile.
Visit Website and Schedule Service CTA's (highest engagement).
Educational pages for Certified Collision Centers and Express Maintenance.
Filtering functionality and feature tags for multiple location types.
Button to open address in Google Maps.
Tabs for Sales, Service, and Parts-related information.
Delivery
For our delivery, we annotated every touchpoint of the tool, including the new "My Appointments" tab within the Account Dashboard that would show the user's upcoming or past scheduled services.
Page Annotations
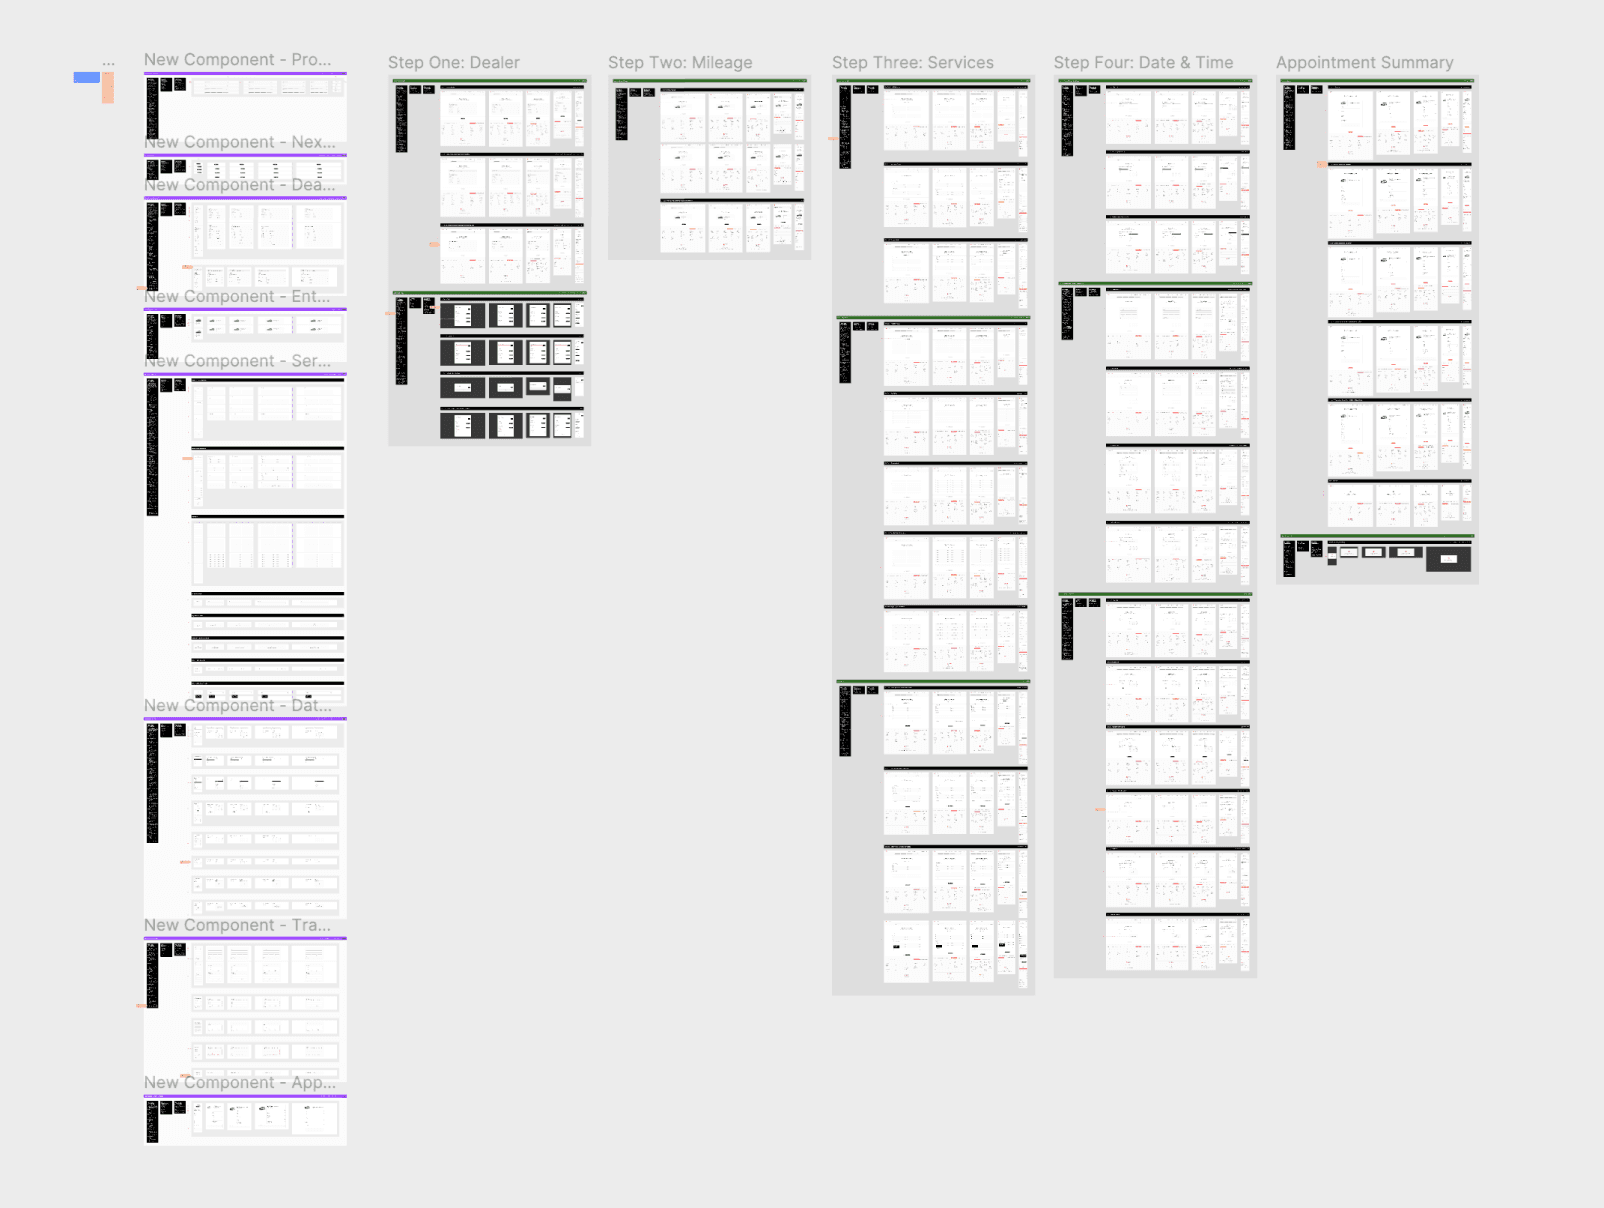
My Dashboard

Scheduler Tool
Step 1: Vehicle Details
Before accessing the tool, users must sign in or create an account. During account creation, they can add one or more vehicles via VIN or model/year. Users who skip this step during account creation will be prompted to add a vehicle and vehicle details (VIN and estimated mileage) at the tool's first step. For users with telematics (Vehicle Health Reports), mileage populates automatically.
Step 2: Dealer Details
The user's VIN identifies their selling (Preferred) dealer, so we'll surface this automatically and prompt them to use it for servicing. If they'd rather use a different dealer or are servicing in another location, the "Change Dealer" CTA opens a modal where they can input their location to find alternatives. Dealers without online scheduling capabilities will be flagged in the results.
Step 3: Services
On this step, users see recommended services, either based on maintenance schedule (factory) or geolocation (dealer). They can add full service bundles or individual services, and can tab over to "All Services" to browse the dealer's full offerings. Users can also add notes about specific vehicle needs, with estimated total pricing available in an expandable drawer above the sticky nav.
Step 4: Final Details
This step gathers final details, including date & time via a calendar component that also supports type-in entry. Advisor and transportation are optional fields with default selections. Choosing "Pick Up", "Delivery", or both for transportation reveals an address input field below. If an address was already captured during account creation (optional entry), it should auto-populate here.
Step 5: Review
On the final step, users review their appointment card and confirm all details before completing the booking. They can click "Edit" on any section to jump back to that point in the stepper. Editing vehicle or dealer details will require redoing all subsequent steps, since those choices affect everything downstream.
Booking Confirmation
Once booked, appointment details appear on the user's account dashboard under "My Appointments," and are also accessible from the vehicle dashboard. From here, users can view upcoming and past appointments, see pricing details, add appointments to their calendar, and cancel if needed.
Takeaways and Next Steps
Given the large number of entry points and use cases, this project required close attention to detail. There are several variations of the experience, depending on factors like entry point, sign-in status, and how much account information we already have (vehicle, VIN, preferred dealer, telematics). Some selections throughout the flow can trigger different states and additional information needed. This project demanded an extensive cross-functional collaboration across two different dev teams and the Lexus team.
Now that the scheduler has launched, we're looking at ways to streamline scheduling further and help dealerships provide more complete information about their service offerings (real-time pricing, descriptions, and up-to-date content). We intend to examine the value of requiring users to add their VIN before scheduling - depending on completion rates, this may be a requirement we remove in the future.
Appointment Scheduler
Allowing users to schedule appointments for their vehicles on Toyota.com.
Lead UX/UI Designer
Feb. 2023
June 2023
Background
As Toyota strives to enhance their online customer experience, it’s imperative we provide users an appointment scheduling experience without having to leave the site.
Challenge
Shoppers and owners are searching for sales and service appointment scheduling tools on the Toyota website, but have to exit and visit a dealer website in order to do so, either giving up altogether or slowing the leads process.
Opportunity
Design an integrated appointment scheduler on the highest business tier, so users can take valuable actions and connect with the dealer right then and there, creating long-term brand loyalty and cultivating hard leads.
Outcome
After implementing our new tool, a 90-Day Report showed the following:
11%
of account logins came from the appointment scheduler.
9.5%
of account creations came from the appointment scheduler.
50k+
customers signed in to schedule service appointments.
Approach Overview
We know there is high demand for an appointment tool, with the “Service Centers” page having the highest traffic of all owner’s-related pages (112k+ average monthly visits). The scheduling process is generally a dealer’s first impression and critical touchpoint, so we used the double diamond framework to deliver an exceptional experience.
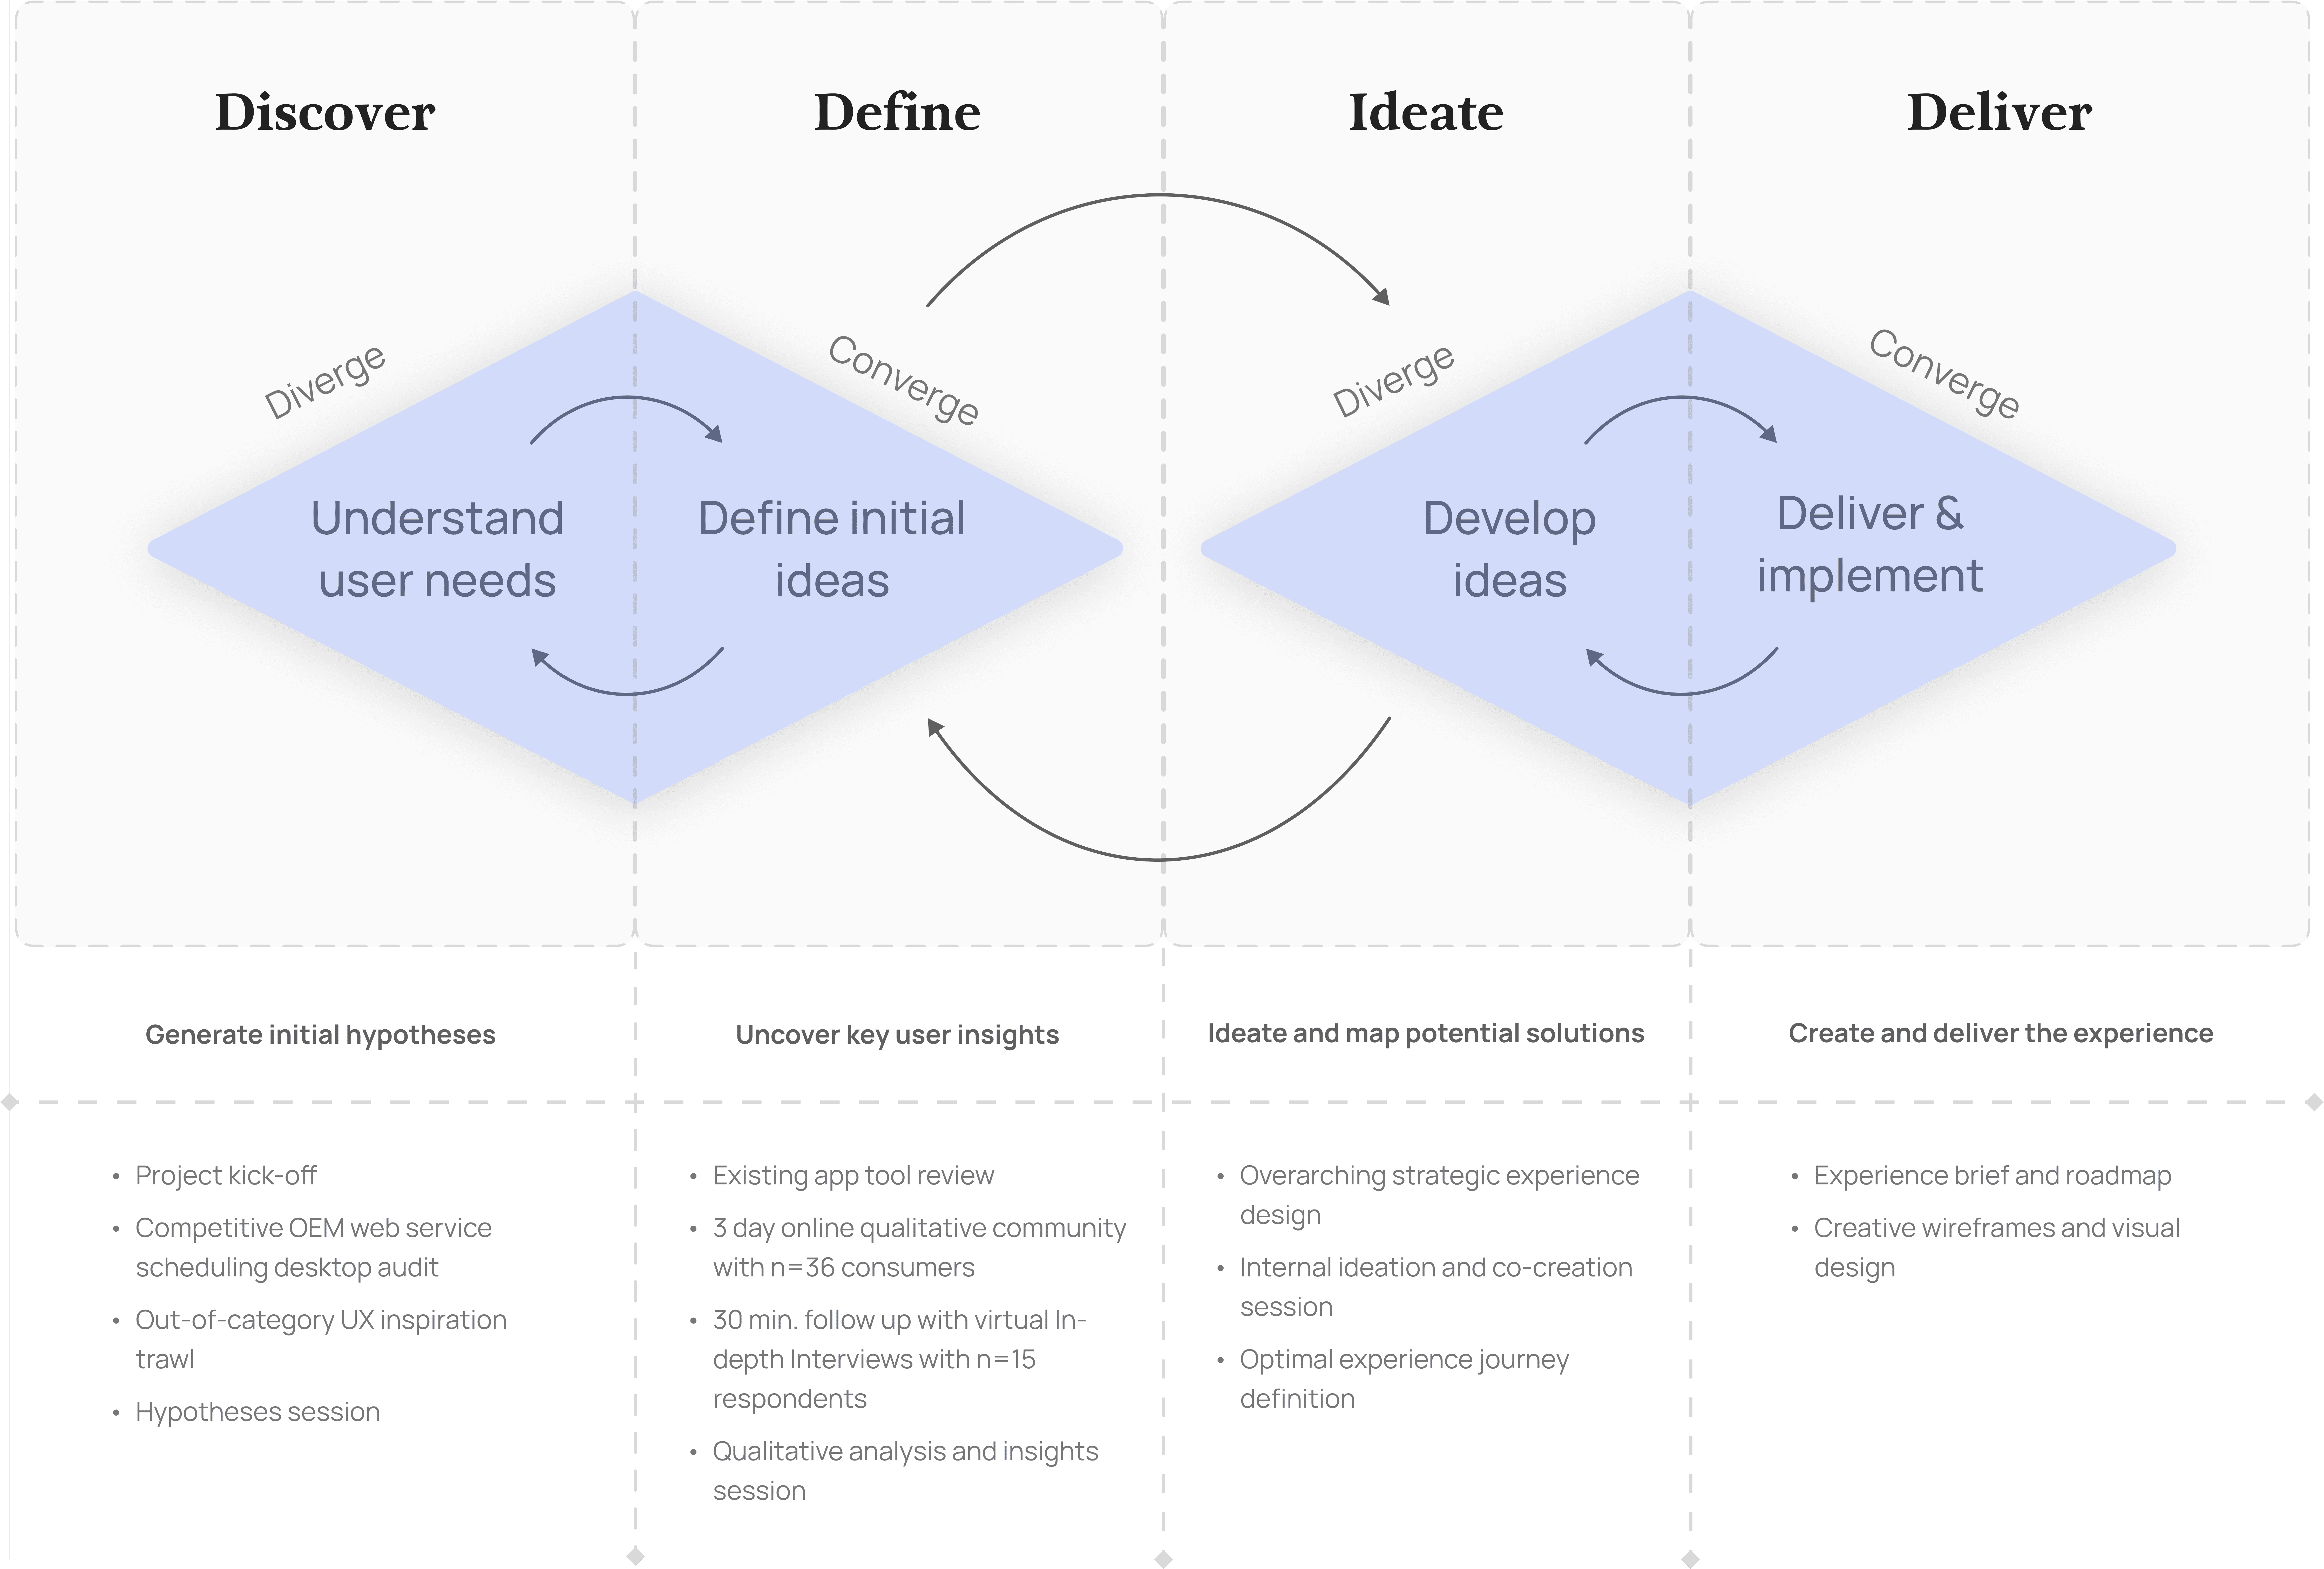
Discovery
To understand user needs and uncover key insights, we began with a competitive audit of other tools and then conducted user testing on the Toyota App's existing appointment scheduling tool.
Landscape Analysis
We found that almost all competitive brands give users the option to schedule service or a test drive on their main platform. Within respective placements and tools, a CTA for “Test Drive” was usually given more prominence than a CTA for “Request a Quote” or "Contact a Dealer".

We then investigated the flow for each competitor’s actual scheduling tool, with most leveraging external platforms for UI, leading to some inconsistencies and usability issues. To better support our budget, branding, customization, and overall user experience goals, we chose to build a custom scheduler tool. Key takeaways from our tool audits include:
Account creation should be optional
Users can typically make appointments without having to create an account.
The tool should be flexible & adaptive
Users can track progress or edit selections as they build out their appointment.
Aim for a low-friction start
Barrier to entry is eased by collecting personal/account info after gathering basic appointment details.
Shopper & owners kept separate
There were no universal scheduler tools - sales & service appointments are usually kept separate.
Account creation should be optional
Users can typically make appointments without having to create an account.
Aim for a low-friction start
Barrier to entry is eased by collecting personal/account info after gathering basic appointment details.
The tool should be flexible & adaptive
Users can track progress or edit selections as they build out their appointment.
Shopper & owners kept separate
There were no universal scheduler tools - sales & service appointments are usually kept separate.
Service First
Given resourcing constraints and the client's emphasis on strengthening the current ownership experience, we prioritized service scheduling first, with test drives planned as a fast follow. Adding service scheduling at the highest business tier represents a major value-add, and given that the Toyota App's version already exists, we had a quicker path to implementation.
Service First
Given resourcing constraints and the client's emphasis on strengthening the current ownership experience, we prioritized service scheduling first, with test drives planned as a fast follow. Adding service scheduling at the highest business tier represents a major value-add, and given that the Toyota App's version already exists, we had a quicker path to implementation.
Enter Mileage
Select Services
Select Advisor
Select Transportation
Select Date & Time
Confirmation
Current App Experience
We aimed to maintain general parity with the existing app scheduler's flow and functionality for our web implementation. Toyota manages their app internally, so we kept in mind a key pain point for our users is the lack of information transfer between web and app accounts. To ease the burden of scheduling, we made sure users would not be asked to re-provide information that's already been captured elsewhere.
Enter Mileage
Select Services
Select Advisor
Select Transportation
Select Date & Time
Confirmation
Toyota App Schedule Service Flow
Usability Observations
To inform the best possible MVP for our web implementation of Toyota's app-based service scheduler, we conducted a two-phase study: a 3-day online research community for broad comparative feedback, followed by 15 in-depth interviews to dive deeper into scheduling behaviors and pain points. In total, 44 Toyota owners participated (26 men 25–45 years old, 18 women 46–65 years old, spanning all four U.S. regions). All participants had booked a service appointment within the past six months.
Phase 01
Pre-Scheduling Stage Findings
Personal info is gathered at the beginning of the process, and not all previously captured info is pre-populated.
“I would have liked to see my last visit and personal information stored to make the process go more quickly.”
Male, Gen Y
Participants are shown all services upfront, which can be overwhelming.
"With other scheduling platforms, like Equinox, if I want more info I can opt to see it instead of being overwhelmed with a busy screen. This was a huge pain point."
Male, Gen Z
Personal info is gathered at the beginning of the process, and not all previously captured info is pre-populated.
“I would have liked to see my last visit and personal information stored to make the process go more quickly.”
Male, Gen Y
Participants are shown all services upfront, which can be overwhelming.
"With other scheduling platforms, like Equinox, if I want more info I can opt to see it instead of being overwhelmed with a busy screen. This was a huge pain point."
Male, Gen Z
Phase 02
Scheduling & Post-Scheduling Stage Findings
Participants want transparent service pricing and timing, and disliked having to call the dealer during any point of the process.
“They don't tell you how long the service will be, so I would plan for longer than you think."
Female, Gen Y
Participants appreciated thorough dealer communications.
“I like that I get both email and text, because sometimes I miss one or the other. I like the confirmation email, and the text-reminders."
Female, Gen Z
Phase 02
Scheduling & Post-Scheduling Stage Findings
Participants want transparent service pricing and timing, and disliked having to call the dealer during any point of the process.
“They don't tell you how long the service will be, so I would plan for longer than you think."
Female, Gen Y
Participants appreciated thorough dealer communications.
“I like that I get both email and text, because sometimes I miss one or the other. I like the confirmation email, and the text-reminders."
Female, Gen Z
Design Implications
Simplicity and clear navigation are our quick wins — fewer steps, less complexity. Using progressive reveal and limiting options shown upfront will ease the mental burden for the user. We should stick to familiar scheduling patterns while building education and transparency around service offerings. Rather than directing users to contact the dealer and presenting them with dead ends, the tool should be able to handle all information gathering and provide answers.
Design Implications
Simplicity and clear navigation are our quick wins — fewer steps, less complexity. Using progressive reveal and limiting options shown upfront will ease the mental burden for the user. We should stick to familiar scheduling patterns while building education and transparency around service offerings. Rather than directing users to contact the dealer and presenting them with dead ends, the tool should be able to handle all information gathering and provide answers.
Business Requirements
For the purpose of confirming legitimate appointments and the overarching business goal of getting users to create accounts and add VINS, the business outlined a critical constraint for our MVP launch.
Adding a 17-Digit VIN
Users would have to add their Vehicle Identification Number before scheduling service, which is only possible in a logged in state. We recognize that only a small percentage of users (~2%) add their VIN during account creation, which would impact the scheduler's completion rate. However, this requirement provides a default dealer, confirms the legitimacy of the appointment, and gives the dealer critical vehicle information to provide helpful service recommendations and a higher quality service experience. We may revisit this requirement post-launch based on performance data and user feedback.
Wireframe Directions
Knowing this experience would be VIN-gated, which is a large barrier to entry, we ensured designs were seamless, simple and as user-friendly as possible. Per our requirements, users would have to sign in or create an account and add their VIN before scheduling. We presented two variations of this flow to the client.
Stacked Scheduler
Step 1: Vehicle Details
Once signed in, users will select a vehicle from their account, or add a new one. Once selected, they'll add the VIN (if not already added) and mileage.
Step 2: Dealer
A preferred dealer will be shown on default based on the added VIN. To choose a different dealer, the "Change Dealer" CTA will open the find a dealer modal.
Step 3: Services
Users can view services recommended to them based on their selected dealer and location, as well as the total estimated cost of their added services.
Step 4: Advisor
By default, any advisor will be selected. If they choose a preferred service provider, this selection will be carried over for any future appointments.
Step 5: Transportation
On this step, users choose transportation - if they select pick up/delivery or both, they need to add or confirm their address for these locations- unless it was added during account creation.
Step 6: Date & Time
Users will use a calendar component for date and time selection - only available appointment times will appear.
Step 7: Review
Users will confirm their appointment and book on this step, or can go back and edit.
Booking Confirmation
Once booked, appointment details will be visible on the account dashboard within the "My Appointments" section. From here, users can view and manage upcoming and past appointments.
Stacked Scheduler
Step 1: Vehicle Details
Once signed in, users will select a vehicle from their account, or add a new one. Once selected, they'll add the VIN (if not already added) and mileage.
Step 2: Dealer
A preferred dealer will be shown on default based on the added VIN. To choose a different dealer, the "Change Dealer" CTA will open the find a dealer modal.
Step 3: Services
Users can view services recommended to them based on their selected dealer and location, as well as the total estimated cost of their added services.
Step 4: Advisor
By default, any advisor will be selected. If they choose a preferred service provider, this selection will be carried over for any future appointments.
Step 5: Transportation
On this step, users choose transportation - if they select pick up/delivery or both, they need to add or confirm their address for these locations- unless it was added during account creation.
Step 6: Date & Time
Users will use a calendar component for date and time selection - only available appointment times will appear.
Step 7: Review
Users will confirm their appointment and book on this step, or can go back and edit.
Booking Confirmation
Once booked, appointment details will be visible on the account dashboard within the "My Appointments" section. From here, users can view and manage upcoming and past appointments.
Linear Scheduler
Recommendation
Step 1: Vehicle Details
Once signed in, users will select a vehicle from their account, or add a new one. Once selected, they'll add the VIN (if not already added) and mileage.
Step 2: Dealer
A preferred dealer will be shown on default based on the added VIN. To choose a different dealer, the "Change Dealer" CTA will open the find a dealer modal.
Step 3: Services
Users can view services recommended to them based on their selected dealer and location, as well as the total estimated cost of their added services.
Step 4: Final Details
This step consolidates advisor and transportation selection (pre-selected by default) and date and time selection.
Step 5: Review
Users will confirm their appointment and book on this step, or can go back and edit.
Booking Confirmation
Once booked, appointment details will be visible on the account dashboard within the "My Appointments" section. From here, users can view and manage upcoming and past appointments.
Linear Scheduler
Recommendation
Step 1: Vehicle Details
Once signed in, users will select a vehicle from their account, or add a new one. Once selected, they'll add the VIN (if not already added) and mileage.
Step 2: Dealer
A preferred dealer will be shown on default based on the added VIN. To choose a different dealer, the "Change Dealer" CTA will open the find a dealer modal.
Step 3: Services
Users can view services recommended to them based on their selected dealer and location, as well as the total estimated cost of their added services.
Step 4: Final Details
This step consolidates advisor and transportation selection (pre-selected by default) and date and time selection.
Step 5: Review
Users will confirm their appointment and book on this step, or can go back and edit.
Booking Confirmation
Once booked, appointment details will be visible on the account dashboard within the "My Appointments" section. From here, users can view and manage upcoming and past appointments.
Feedback
We received feedback on wireframe directions from the internal team, clients and stakeholders.
Ensure navigation stays visible at all times (mobile-first), and keep steps simplified without burying key information, especially on the service selection step.
Use direct, clear, and conversational language throughout the flow. Users should be able to educate themselves about unfamiliar services, especially first time schedulers.
For dealer selection, include map imagery for quicker recognition. For date selection, allow users to type in their preferred date in addition to selecting from the calendar dropdown.
Final Interface
Our recommended direction, the Linear Scheduler, was the preferred option. It offered more familiar interaction patterns that resonated with the team and aligned with typical scheduling tools across the competitive landscape. This direction included a progress tracker, consolidated smaller steps, and made it easier for users to complete sub-tasks within the flow than the accordion version. Overall, it was more digestible, usable, and simple.
Step 1: Vehicle Details
Before accessing the tool, users must sign in or create an account. During account creation, they can add one or more vehicles via VIN or model/year. Users who skip this step during account creation will be prompted to add a vehicle and vehicle details (VIN and estimated mileage) at the tool's first step. For users with telematics (Vehicle Health Reports), mileage populates automatically.
Step 2: Dealer Details
The user's VIN identifies their selling (Preferred) dealer, so we'll surface this automatically and prompt them to use it for servicing. If they'd rather use a different dealer or are servicing in another location, the "Change Dealer" CTA opens a modal where they can input their location to find alternatives. Dealers without online scheduling capabilities will be flagged in the results.
Step 3: Services
On this step, users see recommended services, either based on maintenance schedule (factory) or geolocation (dealer). They can add full service bundles or individual services, and can tab over to "All Services" to browse the dealer's full offerings. Users can also add notes about specific vehicle needs, with estimated total pricing available in an expandable drawer above the sticky nav.
Step 4: Final Details
This step gathers final details, including date & time via a calendar component that also supports type-in entry. Advisor and transportation are optional fields with default selections. Choosing "Pick Up", "Delivery", or both for transportation reveals an address input field below. If an address was already captured during account creation (optional entry), it should auto-populate here.
Step 5: Review
On the final step, users review their appointment card and confirm all details before completing the booking. They can click "Edit" on any section to jump back to that point in the stepper. Editing vehicle or dealer details will require redoing all subsequent steps, since those choices affect everything downstream.
Booking Confirmation
Once booked, appointment details appear on the user's account dashboard under "My Appointments," and are also accessible from the vehicle dashboard. From here, users can view upcoming and past appointments, see pricing details, add appointments to their calendar, and cancel if needed.
Scheduler Tool
Final UI
MVP Feature List
01
Create and manage service appointments
02
Ability to view appointment history
03
Ability to add a vehicle or edit a Preferred Dealer
04
Pre-populate any relevant previously captured data
05
Confirmations and reminders from dealer
Recommended Entry Points
Homepage
Vehicle Dashboard
Owner’s Resource Pages
Find a Dealer Map
Service Offers
Scheduler Tool
Final User Interface
Step 1: Vehicle Details
Before accessing the tool, users must sign in or create an account. During account creation, they can add one or more vehicles via VIN or model/year. Users who skip this step during account creation will be prompted to add a vehicle and vehicle details (VIN and estimated mileage) at the tool's first step. For users with telematics (Vehicle Health Reports), mileage populates automatically.
Step 2: Dealer Details
The user's VIN identifies their selling (Preferred) dealer, so we'll surface this automatically and prompt them to use it for servicing. If they'd rather use a different dealer or are servicing in another location, the "Change Dealer" CTA opens a modal where they can input their location to find alternatives. Dealers without online scheduling capabilities will be flagged in the results.
Step 3: Services
On this step, users see recommended services, either based on maintenance schedule (factory) or geolocation (dealer). They can add full service bundles or individual services, and can tab over to "All Services" to browse the dealer's full offerings. Users can also add notes about specific vehicle needs, with estimated total pricing available in an expandable drawer above the sticky nav.
Step 4: Final Details
This step gathers final details, including date & time via a calendar component that also supports type-in entry. Advisor and transportation are optional fields with default selections. Choosing "Pick Up", "Delivery", or both for transportation reveals an address input field below. If an address was already captured during account creation (optional entry), it should auto-populate here.
Step 5: Review
On the final step, users review their appointment card and confirm all details before completing the booking. They can click "Edit" on any section to jump back to that point in the stepper. Editing vehicle or dealer details will require redoing all subsequent steps, since those choices affect everything downstream.

Booking Confirmation
Once booked, appointment details appear on the user's account dashboard under "My Appointments," and are also accessible from the vehicle dashboard. From here, users can view upcoming and past appointments, see pricing details, add appointments to their calendar, and cancel if needed.
Delivery
For our delivery, we annotated every touchpoint of the tool, including the new "My Appointments" tab within the Account Dashboard that would show the user's upcoming or past scheduled services.
Page Annotations
My Dashboard
Takeaways and Next Steps
Given the large number of entry points and use cases, this project required close attention to detail. There are several variations of the experience, depending on factors like entry point, sign-in status, and how much account information we already have (vehicle, VIN, preferred dealer, telematics). Some selections throughout the flow can trigger different states and additional information needed. This project demanded an extensive cross-functional collaboration across two different dev teams and the Lexus team.
Now that the scheduler has launched, we're looking at ways to streamline scheduling further and help dealerships provide more complete information about their service offerings (real-time pricing, descriptions, and up-to-date content). We intend to examine the value of requiring users to add their VIN before scheduling - depending on completion rates, this may be a requirement we remove in the future.